Before you start transferring your content from one iPad to another, it’s essential to ensure that both devices are ready to connect. Follow these simple steps to set up your iPads for a smooth transition from the old iPad to the new one:
1. Quick Start (Fastest & Easiest)
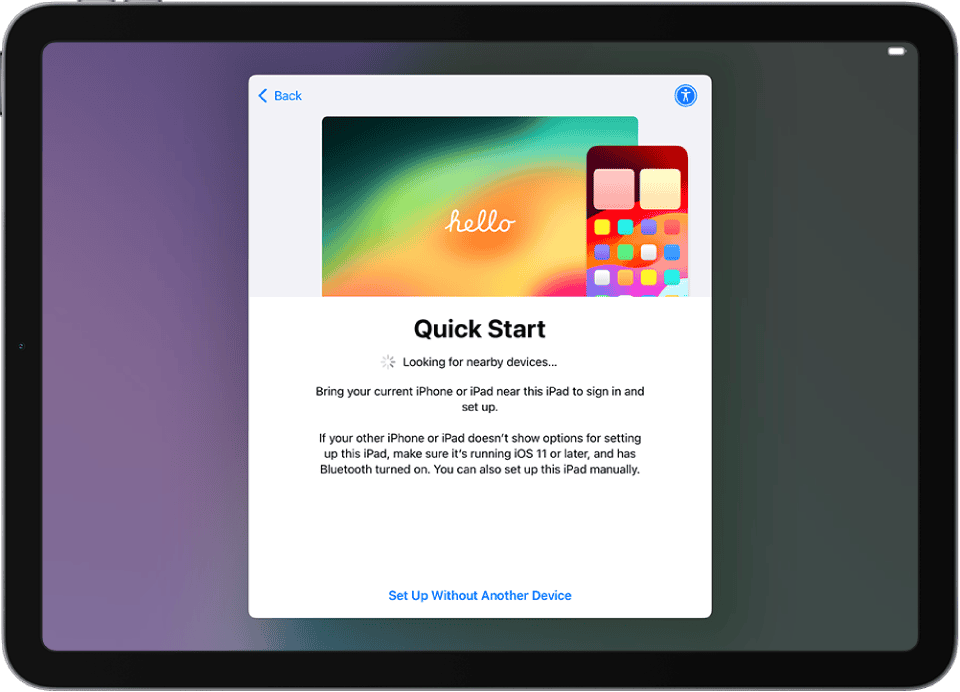
Quick Start uses your old iPad to set up the new one wirelessly.
Steps:
- Turn on your new iPad and place it near your old one.
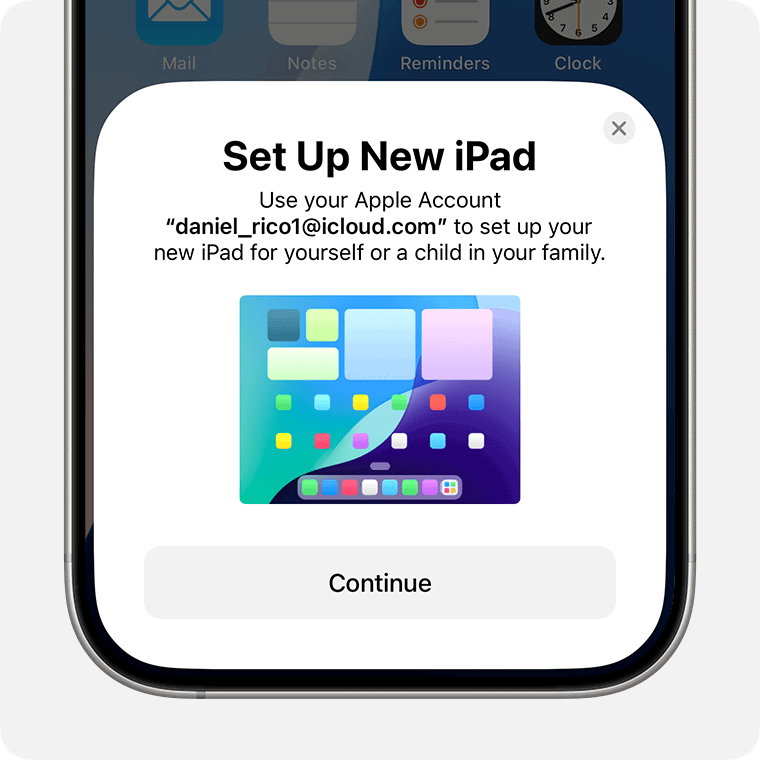
- On the old iPad, a Set Up New iPad screen will appear — tap Continue.
- Use the old iPad’s camera to scan the animation on the new iPad.
- Enter your old iPad’s passcode on the new one.
- Follow the prompts to set up Face ID/Touch ID.
- Select Transfer from iPad to move data directly (keep both devices near each other and connected to power).
👉 This method transfers everything (apps, settings, photos, etc.) directly and is usually the smoothest.
(Source: Tom’s Guide)
2. iCloud Backup & Restore
If you prefer using iCloud:
Steps:
- On your old iPad, go to Settings > [Your Name] > iCloud > iCloud Backup.
- Tap Back Up Now and wait until the backup finishes.
- Turn on your new iPad.
- During setup, choose Restore from iCloud Backup.
- Sign in with your Apple ID and select the latest backup.
👉 Requires Wi‑Fi and enough iCloud storage space.
(Source: Apple Support)
3. Computer (Finder or iTunes)
If you’d rather use a Mac or PC:
Steps:
- Connect your old iPad to your computer.
- On macOS Catalina or later: open Finder.
- On macOS Mojave or earlier / Windows: open iTunes.
- Select your iPad and click Back Up Now (choose Encrypt Backup if you want health & password data).
- Disconnect the old iPad and connect the new one.
- On the setup screen, choose Restore from Mac or PC.
- Select the backup you just made.
👉 Best if you don’t have enough iCloud storage or want a faster transfer.
4. Manual Transfer (For Select Files Only)
If you don’t want a full migration:
- Use AirDrop to send photos, files, and contacts.
- Use iCloud Drive, Dropbox, or another cloud service to move documents.
- Re‑download apps from the App Store (they’re tied to your Apple ID).
✅ Tips for a Smooth Transfer
- Keep both iPads connected to Wi‑Fi and power during the process.
- Ensure your old iPad is updated to the latest iPadOS version.
- If you use Apple Watch, you’ll need to unpair it from the old device before pairing with the new one.
👉 Best option for most users: Use Quick Start if both iPads are running iPadOS 12.4 or later. It’s the fastest and most complete method.
Everything You Need For a Smooth Transfer
Before You Start
- Backup your old iPad: This is critical to avoid losing anything important. You can back up to iCloud or your computer.
- Both iPads need power: Plug them in just in case the process takes a while.
- Stable Wi-Fi is your friend: Make sure you have a good signal on both of your iPads.
Method 1: iCloud Backup & Restore
This is a convenient wireless option if you have enough iCloud storage.
How to Backup to iCloud
- Connect to Wi-Fi on your old iPad.
- Go to Settings > [Your Name] > iCloud > iCloud Backup.
- Tap Back Up Now.
Restoring from iCloud on Your New iPad
- Turn your new iPad on.
- Follow setup steps until the “Apps & Data” screen.
- Choose “Restore from iCloud Backup” and sign in with your Apple ID.
- Select the latest backup and wait.
Method 2: Quick Start
This uses your old iPad to help set up your new one. It’s a good choice if you want a direct transfer.
- Turn on your new iPad and put it near the old one.
- A Quick Start screen will appear on your old iPad – follow the instructions.
- You may need to enter your old iPad’s passcode on the new one.
Method 3: Computer Backup
If you need to avoid iCloud, use your computer as a middleman.
| Platform | Software |
|---|---|
| Mac | Finder |
| Windows | iTunes |
Backing up to a Computer
- Connect old iPad to computer and trust the device if prompted.
- Open Finder (Mac) or iTunes (Windows) and select your iPad.
- Click “Back Up Now”.
Restoring a Computer Backup on Your New iPad
- Connect new iPad to the same computer.
- In Finder or iTunes, select your new iPad.
- Choose “Restore Backup” and pick the latest backup.
No matter which method you choose, be patient. Transferring all your data might take a while!
Preparing Your iPads for Transfer
Checking Device Compatibility
First, verify that both your old and new iPads are compatible with the latest version of iOS. Go to Settings > General > About and check the Model Name. You can find a list of compatible devices on Apple’s official website.
Updating to the Latest iOS
For a seamless transfer, ensure both iPads have the latest iOS version installed. Update your devices by opening Settings, tapping General, and then Software Update. If a new version is available, follow the on-screen instructions to install it.
Backing Up Your Old iPad
Create a recent backup of your old iPad to safeguard all your data. Go to Settings, tap your Apple ID name at the top, then iCloud. Select iCloud Backup and choose Back Up Now. Remember to stay connected to Wi-Fi during this process. Ensure you know your Apple ID and passcode as they will be needed during the transfer to your new iPad.
Transferring Data to Your New iPad
When you get a new iPad, moving your photos, apps, and settings over can seem like a daunting task. But with the right tools and a clear set of instructions, you’ll have your new device feeling like home in no time.
Using Quick Start for Device Setup
Quick Start is a seamless method to set up your new iPad using your old one. Ensure both devices have Bluetooth turned on and are close to each other. A setup animation will appear on the new iPad. Hold your old device over the new one to capture the pattern that appears on the screen. Enter your Apple ID password on your new device when prompted. You can then choose to transfer your data from your old iPad to your new one.
Restoring from iCloud Backup
To restore your data from an iCloud backup, make sure your new iPad is connected to Wi-Fi and logged into your Apple ID. During the initial setup, choose ‘Restore from iCloud Backup’, select the most recent backup, and stay connected to Wi-Fi. Your apps, photos, and settings will download in the background, allowing you to use your iPad while the data restores.
Using Finder or iTunes
For those with Macs running macOS Catalina or later, Finder is used for backup and restore functions. Connect your old iPad to your Mac, open Finder, select your device, and click ‘Back Up Now’. After backing up, connect your new iPad, and in Finder, click ‘Restore Backup’, choosing the one you just made.
With PCs or Macs running older versions of macOS, iTunes will be your go-to. The process mirrors Finder: connect your old iPad, open iTunes, choose ‘Back Up Now’, and then connect your new device and click ‘Restore Backup’.
Finalizing iPad Setup
Once you’ve got your new iPad up and running, a few more steps will ensure it’s secure, personalized, and ready for use.
Setting Up Touch ID or Face ID
For a new iPad that supports Touch ID or Face ID, one needs to follow the on-screen instructions to enroll their fingerprints or facial map. This not only secures the device but also simplifies the login process. Users can go to Settings, tap Touch ID & Passcode or Face ID & Passcode, and choose to Add a Fingerprint or Set Up Face ID.
Configuring Apple Pay and Wallet
To set up Apple Pay, they should open the Wallet app, tap the “+” sign, and follow prompts to add a credit or debit card. This way, simplified payments are just a touch or a glance away. For owners of an Apple Watch, they can also pair their watch with the new iPad via the Watch app and enjoy seamless payment options across both devices.
Exploring New iPad Features
Lastly, it’s time to discover what the new iPad has to offer. One can familiarize themselves with the latest gestures for navigation, customize the Control Center, enable Screen Time for digital health, and explore Find My to keep tabs on their Apple devices. Users should also ensure all their cherished apps are downloaded from the App Store and that essential services like email are fully set up.
Frequently Asked Questions
When it comes to upgrading your iPad, you might have a lot of questions about transferring all your stuff. No need to worry—this section is packed with clear answers to make the switch smooth and hassle-free.
How can I migrate data from my old iPad to my new iPad without using iCloud?
You can migrate your data using Apple’s Quick Start feature. Just place both iPads close to one another, and the new iPad will guide you through the transfer process once you turn it on. Make sure both devices have Wi-Fi and Bluetooth enabled.
What are the steps to set up a new iPad using the data from an old iPad?
First, turn on your new iPad and bring it near your old one. Your new iPad should display a Quick Start pop-up that helps transfer your data. Follow the onscreen steps, and you’ll see an option to transfer from iPad to iPad directly.
Is it possible to use my old iPad after moving all of its data to a new iPad?
Yes, you can use your old iPad even after transferring data to a new one. The migration process copies data rather than removing it, so your apps and files will still be accessible on the old iPad.
Does transferring my data to a new iPad erase the information on my old device?
No, transferring data does not erase anything from your old iPad. It simply copies the data to your new iPad.
How can I transfer applications to a new iPad from my previous iPad?
When transferring data using Quick Start or iCloud backups, your apps are automatically transferred over. If needed, you can download any missing apps from the App Store using the same Apple ID.
What is the procedure for resetting an iPad and then transferring its data to another iPad?
To reset your iPad, go to Settings > General > Reset, and then select ‘Erase All Content and Settings.’ After resetting, follow the steps for Quick Start as you would to transfer data to a new iPad.

