Taking screenshots on a Mac is easy. This feature helps you capture important information, create tutorials, or save interesting content from your screen. Macs have built-in tools for taking screenshots of the entire screen, a selected area, or a specific window, so you don’t need any extra software.
You can use the Screenshot toolbar or keyboard shortcuts to capture images quickly. Editing your screenshots is simple too. After you capture what you want, Apple’s tools let you edit and add notes to the images right away. You can then save your screenshot to different locations, making it easy to find later. If you need more features, third-party tools offer added options for advanced tasks beyond what macOS provides.
Method 1: Full-Screen Screenshot
This method captures an image of your entire screen.
- Shortcut: Press Command (⌘) + Shift + 3 simultaneously.
- Result: A thumbnail of the screenshot will appear in the bottom-right corner of your screen. You can click on it to edit it, or simply wait a few seconds for it to automatically save to your Desktop as a PNG file.
Method 2: Screenshot a Specific Window
This method allows you to capture a single open window without capturing the background or other elements.
- Shortcut: Press Command (⌘) + Shift + 4 simultaneously, then press the Spacebar.
- Result: Your cursor will turn into a camera icon. Click on the window you want to capture. The screenshot will be saved to your Desktop.
Method 3: Screenshot a Specific Area
This is useful for capturing just a portion of your screen.
- Shortcut: Press Command (⌘) + Shift + 4 simultaneously.
- Result: Your cursor will turn into a crosshair icon. Click and drag your mouse to select the area you want to capture. Release the mouse button to take the screenshot. The image will be saved to your Desktop.
Method 4: Using the Screenshot App (macOS Mojave and later)
For more advanced options, macOS Mojave (and later) includes a dedicated Screenshot app.
- Shortcut: Press Command (⌘) + Shift + 5.
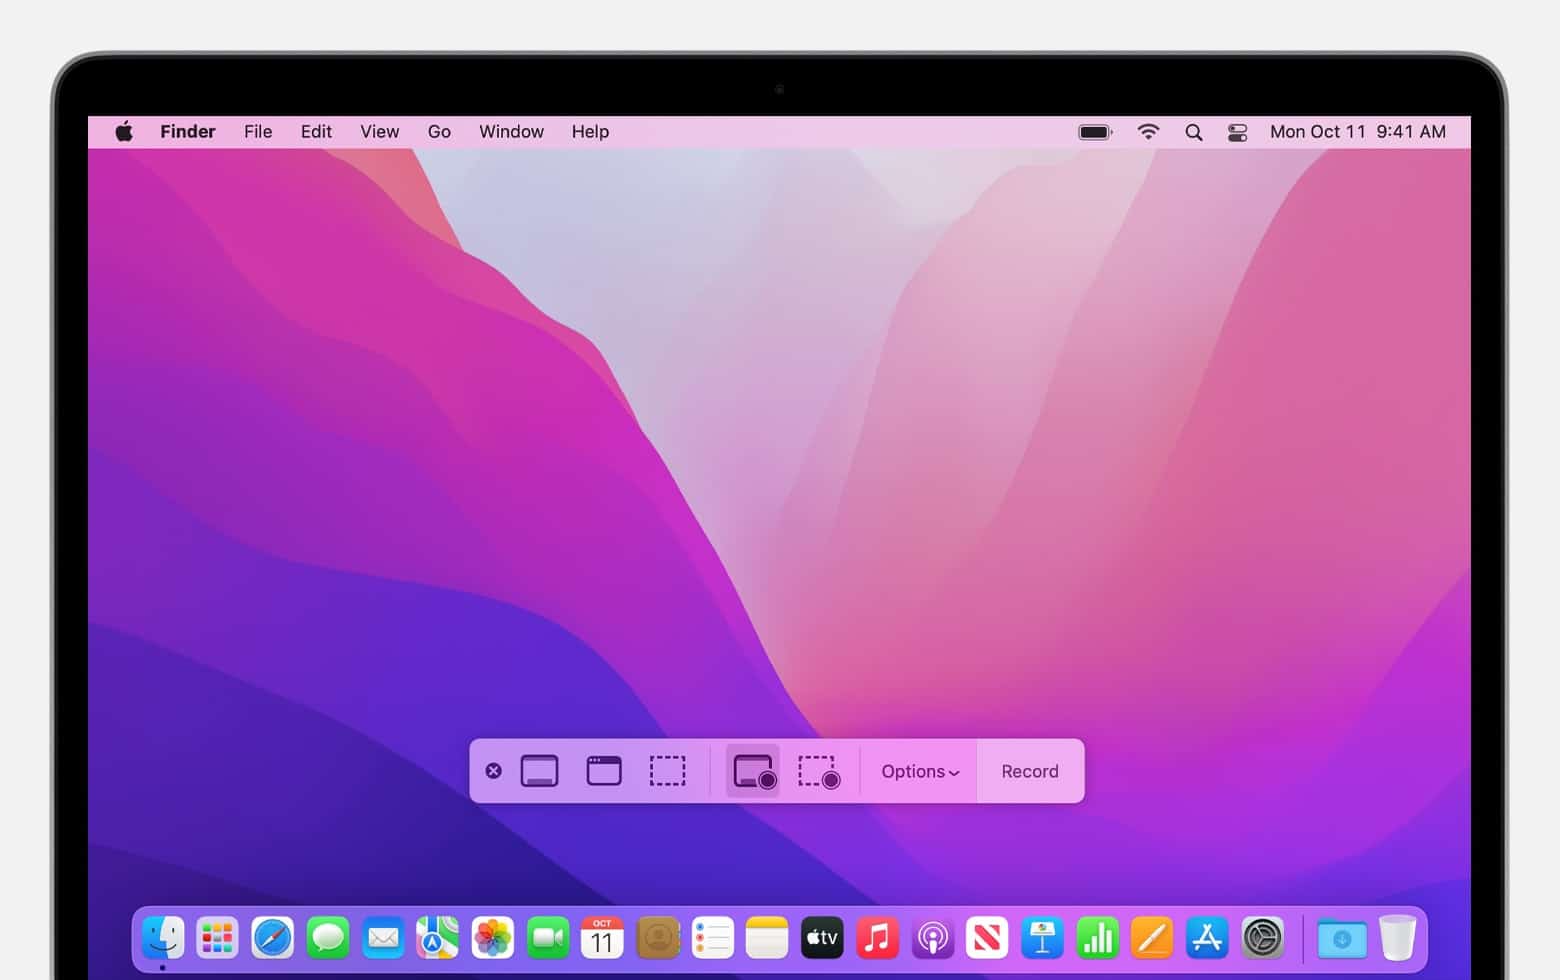
- Result: A small control bar will appear at the bottom of your screen with various options:
- Capture Entire Screen: Captures everything.
- Capture Selected Window: Captures a specific window.
- Capture Selected Portion: Captures a custom area.
- Record Entire Screen: Records a video of your screen.
- Record Selected Portion: Records a video of a specific area.
- Options: The “Options” button in the control bar lets you change where the screenshot is saved (e.g., Desktop, Documents, Clipboard), set a timer, and include your mouse clicks in screen recordings.
Tips and Tricks
- Saving to Clipboard: To copy a screenshot directly to your clipboard instead of saving it to your Desktop, simply hold the Control (⌃) key while using any of the shortcuts. For example, Command (⌘) + Shift + 3 + Control (⌃) will copy a full-screen screenshot to your clipboard.
- Annotation: After taking a screenshot, a small thumbnail will appear in the bottom-right corner. Clicking on this thumbnail allows you to immediately crop, annotate, and mark up the image before saving it.
- File Format: By default, screenshots are saved as PNG files. You can change this using a Terminal command, though for most users, the default is sufficient.
Easy Ways to Take Screenshots on Your Mac
The Mac operating system has built-in tools that make taking screenshots incredibly easy. Here’s a quick guide on how to do it.
Using Keyboard Shortcuts
Keyboard shortcuts are the fastest way to take screenshots on a Mac. Here are the most important ones:
- Capture the entire screen: Press Command + Shift + 3
- Capture a specific portion of the screen: Press Command + Shift + 4 and then drag your cursor to select the area you want to capture.
- Capture a window: Press Command + Shift + 4 and then press the Spacebar. Click on the window you want to capture.
Using the Screenshot App
Apple includes a dedicated app called Screenshot that gives you more control over your screenshots.
- Open Screenshot: Press Command + Shift + 5 to open the app’s toolbar.
- Choose your options: The toolbar lets you select what to capture (full screen, a window, a select portion), if you want a timer delay, where to save the screenshot, and more.
- Capture your screenshot: Click “Capture” (for the entire screen or a select portion) or click the window you want.
Editing Your Screenshots
When you take a screenshot, a thumbnail appears briefly in the corner of your screen. Here’s what you can do:
- Click the thumbnail: Opens the screenshot for editing with Markup tools (draw, add shapes, text, sign, etc.)
- Do nothing: The screenshot automatically saves to your desktop by default.
Where Do Screenshots Save?
Your screenshots will be saved automatically on your desktop with a filename “Screen Shot [date] at [time].png”. You can change the default save location in the Screenshot app options.
Additional Notes
- The keyboard shortcuts work on all modern Macs.
- Apple’s support website has even more details: https://support.apple.com/en-us/102646
Key Takeaways
- Macs have built-in capabilities for taking and editing screenshots.
- Keyboard shortcuts and the Screenshot toolbar facilitate quick image captures.
- Additional tools expand functionality for more specialized screen capture needs.
Using the Snipping Tool on Mac
MacOS provides a suite of tools for taking screenshots and recordings that are both efficient and straightforward to use.
How to Access Snipping Tools on macOS
There are convenient keyboard shortcuts that give users instant access to snipping tools:
- Command + Shift + 3: Captures the entire screen.
- Command + Shift + 4: Transforms the cursor into a crosshair for selecting a portion of the screen.
- Shift + Command + 5: Opens the Screenshot toolbar for more capture options.
For recent macs with a Touch Bar, you can add screenshot buttons to the Control Strip to make capturing images even faster.
Capturing Different Types of Screenshots
You can choose to capture the full screen, a selected window, or a specific portion:
- Full-Screen Screenshot: Press Command + Shift + 3 to capture the whole screen.
- Window Screenshot: Pressing Command + Shift + 4, followed by tapping the Spacebar, lets you capture a specific window.
- Selected Area Screenshot: With Command + Shift + 4, drag to select a rectangle area.
Editing and Annotating Screenshots
After taking a screenshot, you can easily make annotations:
- A thumbnail appears in the corner of the screen; click it to edit.
- Use the provided markup tools to write, draw, or highlight on your screenshot.
Managing Screenshots and Configuration
Saving and finding screenshots is simple:
- They are, by default, saved on your desktop but can be saved to other locations using the options menu.
- Configuration settings, such as default location or the timer for screen recording, can be adjusted in system preferences.
Third-Party Snipping Tools for Mac
A variety of third-party apps offer advanced options. Apps like Snagit allow you to take scrolling screenshots and provide customization options for those who need more than macOS’s built-in tools.
Best Practices and Additional Functions
In mastering the Mac Snipping Tool, awareness of shortcuts and efficient file management techniques greatly enhance the user experience. Extending the tool’s use while ensuring privacy, customization, and effective troubleshooting can transform simple screenshots into powerful visual aids.
Shortcuts and Accessibility
Mac users can quickly take a full-screen screenshot with Command + Shift + 3. To capture a portion, Command + Shift + 4 is used, then select the area with the cursor. The Space Bar allows for the capture of a specific window. For users with accessibility needs, Mac’s Accessibility Features in System Preferences can be adjusted to tailor to individual requirements.
Tips for Efficient Screenshot Management
Organizing screenshots right after capture ensures swift retrieval. Save files as PNG for high-quality images and label them appropriately. By default, Macs save screenshots to the desktop, but you can change this in the Screenshot app. Using the Option Key while dragging, you can define the Save To location for immediate file management.
Extending Snipping Capabilities
Beyond static images, the Snipping Tool on Mac can record video clips and select moving on-screen items. This is ideal for creating tutorials or capturing scrolling screens. Tools within the Screenshot app can also add shadow to enhance screenshot visuals.
Privacy and Sharing
Screenshots may contain sensitive data. Always review for private information before sharing via email or social media. Macs offer editing options in the Preview app to blur or crop these sections out. Sharing is simple with the macOS sharing options, including AirDrop, Messages, and more.
Customizing Snipping Experience
Enhance your screenshot workflow by customizing the Control Strip or Menu Bar. This gives quicker access to the tools you use most often. It’s important to know how to customize these in System Preferences for efficiency.
Troubleshooting Common Issues
When the Snipping Tool on Mac does not work, common fixes include checking for macOS updates, restarting the computer, and using keyboard shortcuts correctly. If an issue arises, use the ESC key to cancel an in-progress capture. Ensure the Screenshot app is not restricted by any security settings or parental controls.
Frequently Asked Questions
This section aims to clarify common queries regarding the use of the Snipping Tool on Mac, providing straightforward answers and steps for efficient usage.
How can I take a partial screenshot on a Mac?
Users can capture a specific portion of the screen by pressing Command + Shift + 4. After pressing these keys, a crosshair cursor will appear, allowing you to drag and select the area for the screenshot.
What are the keyboard shortcuts for snipping on a Mac?
To take a full screenshot, press Command + Shift + 3. For a selected portion, use Command + Shift + 4. To open the Screenshot Toolbar for more options, use Shift + Command + 5.
Where are snips saved on a Mac after taking them?
By default, screenshots are saved to the desktop. However, if you use the Screenshot Toolbar, you can choose other locations to save your screenshots, like Documents or Clipboard.
What are some free alternatives to the Snipping Tool on Mac?
Free alternatives include LightShot, Skitch, and the built-in Preview application, all of which allow various screenshot and annotation capabilities.
How can I download a reliable snipping tool for a Mac?
You can download snipping tools from the Mac App Store or trusted software providers’ websites. Always ensure you are downloading from a reputable source to avoid malware.
How do I capture a specific area of my screen on a MacBook Air?
For capturing a specific area, press Command + Shift + 4, and select the desired area with the crosshair cursor that appears. This method is the same across all Mac models, including the MacBook Air.

