Screen recording on an iPhone or iPad makes it simple to capture what’s happening on the screen, whether it’s a game, a tutorial, or a walkthrough of an app. To start, open Control Center, tap the Screen Recording button, and your device will record everything on the display until you stop it. The built-in iOS screen recorder also lets you include sound if needed, making it useful for quick demonstrations or sharing steps with someone.
Many skip using this tool because they don’t realize how fast it is to set up. Once the Screen Recording button is in Control Center, it takes only a couple of taps to start or stop a recording. The finished video saves automatically in the Photos app, ready to edit or share without extra steps.
Knowing how to use this feature can save time and make sharing information easier. It works across iPhone and iPad, with the same process on most modern iOS versions.
How to Screen Record on an iPhone or iPad
Screen recording is a built-in feature on iPhones and iPads (iOS 11 and later). It lets you capture video of your device’s screen — perfect for tutorials, gameplay, or troubleshooting. Here’s everything you need to know.
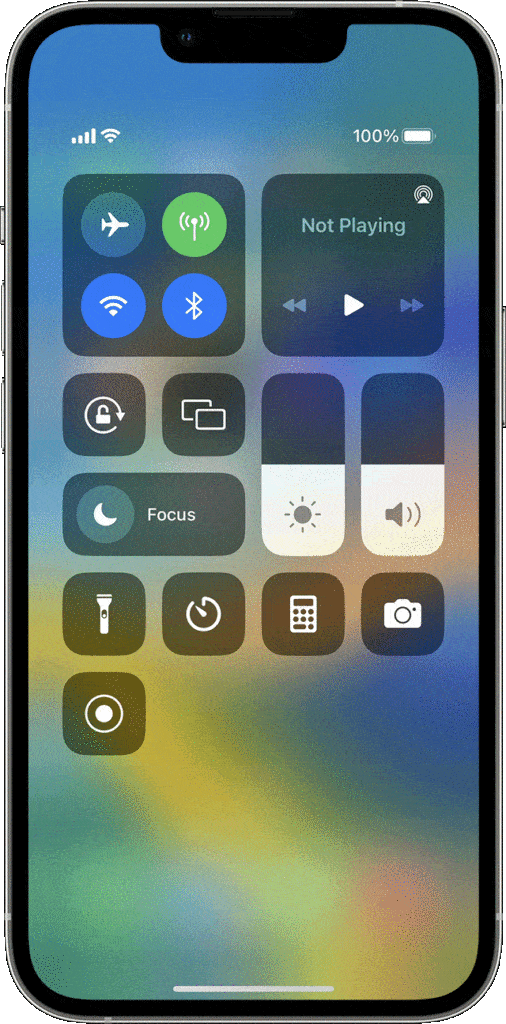
1. Enable Screen Recording in Control Center
Before recording, you need to add the Screen Recording button to your Control Center.
- Open the Settings app.
- Tap Control Center.
- Scroll down and tap the green + next to Screen Recording.
- Now you’ll see the recording icon (a circle inside another circle) in Control Center.
2. Start a Screen Recording
- Open Control Center:
- On iPhones with Face ID: swipe down from the top-right corner.
- On iPhones with a Home button: swipe up from the bottom edge.
- Tap the Screen Recording button.
- A 3-second countdown will appear, then recording starts.
- While recording, the status bar (or Dynamic Island) turns red.
3. Record with or without Sound
- To record without sound: just tap the button.
- To record with sound (microphone audio):
- Press and hold the Screen Recording button in Control Center.
- Tap the Microphone icon to turn it on.
- Tap Start Recording.
4. Stop a Recording
- Tap the red status bar (or Dynamic Island) at the top of your screen, then tap Stop.
- Or, open Control Center and tap the Screen Recording button again.
Your recording is automatically saved to the Photos app under Screen Recordings.
5. Edit or Share Your Recording
- Open the Photos app.
- Find your recording in Recents or Screen Recordings.
- Tap Edit to trim the beginning or end.
- Tap Share (the square with an arrow) to send via Messages, Mail, AirDrop, or social apps.
6. Troubleshooting Tips
- No sound? Make sure the microphone is enabled.
- Recording won’t start? Check if Screen Time restrictions are blocking it.
- App won’t allow recording? Some apps (like streaming platforms) disable recording for copyright reasons.
- Low quality? Ensure your device has enough storage and close unused apps.
7. Key Takeaways
- Screen Recording is built into iOS — no third-party apps required.
- You can record with or without microphone audio.
- All recordings save automatically to the Photos app.
- Some apps may block recording due to content restrictions.
✅ Bottom line: With just a few taps, you can capture your iPhone or iPad screen for tutorials, gaming highlights, or troubleshooting. It’s simple, powerful, and always at your fingertips.
Key Takeaways
- iOS devices have a built-in screen recorder in Control Center
- Recordings can include audio and save directly to Photos
- Adding the tool to Control Center allows faster access
Frequently Asked Questions
Screen recording on iPhone and iPad can capture both video and audio, save directly to the Photos app, and allow quick editing. Users can also troubleshoot common issues or use third-party tools if the built-in feature does not meet their needs.
What steps are involved in recording the screen on an iPhone with the latest iOS update?
Open Control Center by swiping down from the top-right corner.
Tap the Screen Recording button. The recording starts after a short countdown.
To stop, tap the red status bar or the Control Center button again.
Can I record the audio from my microphone while screen recording on an iPad?
Yes. Touch and hold the Screen Recording button in Control Center.
Tap the Microphone icon to turn it on before starting the recording.
This captures both screen activity and voice input.
How can I access and share a screen recording taken on my iPhone?
Recordings save automatically to the Photos app.
Open the app, select the video, and tap the Share icon.
Choose a method such as AirDrop, Messages, Mail, or social media.
Is there a way to edit the length of a screen recording on an iOS device?
Yes. Open the recording in the Photos app.
Tap Edit, then drag the start and end sliders to trim.
Save the changes as a new clip or overwrite the original.
What should I do if the screen recording feature is not working on my iPhone?
Check if Screen Recording is added to Control Center in Settings > Control Center.
Restart the device and ensure Content & Privacy Restrictions are not blocking the feature.
If issues persist, update iOS to the latest version.
Are there any third-party apps recommended for screen recording on iOS devices?
While the built-in tool works for most needs, apps like TechSmith Capture or Record It! offer extra features.
These can include annotations, advanced editing, and direct uploads.
Download them from the App Store if additional tools are required.

