When an iPad’s battery starts to die, it can make the device harder to use. iPads are put together in a way that makes it tricky to swap out the battery. You have two choices: ask Apple for help, or try replacing the battery yourself. Getting battery service may be part of your AppleCare+ plan, if you have it, and that could make it cheaper. As time goes on, an iPad’s battery wears out, so the device won’t stay charged as long and might not work as well. If you’re having these problems, swapping out the battery could make your iPad last longer and work better.
This guide will show you how to swap out the battery in your iPad, and give you some tips and warnings to help you succeed. If you decide to do it yourself, you’ll need to get the right tools and parts, and learn the steps carefully, like from guides or videos. But be careful – doing it yourself might cancel your warranty and is risky, so it’s best for people who are good at fixing electronics.
Replacing Your iPad’s Battery: What You Need to Know
Tools and Materials
- iPad Battery Replacement Kit: This usually includes the new battery, adhesive strips, and necessary tools like a prying tool, suction cup, and screwdrivers.
- Heat Gun or Hair Dryer: To soften the adhesive holding the old battery.
- Isopropyl Alcohol: To clean adhesive residue.
- Optional: Anti-static wrist strap to protect your iPad’s components.
Step-by-Step Guide
- Power Off: Completely power off your iPad before starting the replacement process.
- Heat and Pry: Use a heat gun or hair dryer to gently warm the edges of the screen. This will loosen the adhesive. Carefully insert a prying tool into the gap and work your way around to separate the screen from the body.
- Disconnect: Once the screen is open, locate and disconnect the battery connector and any other cables connecting the screen to the logic board.
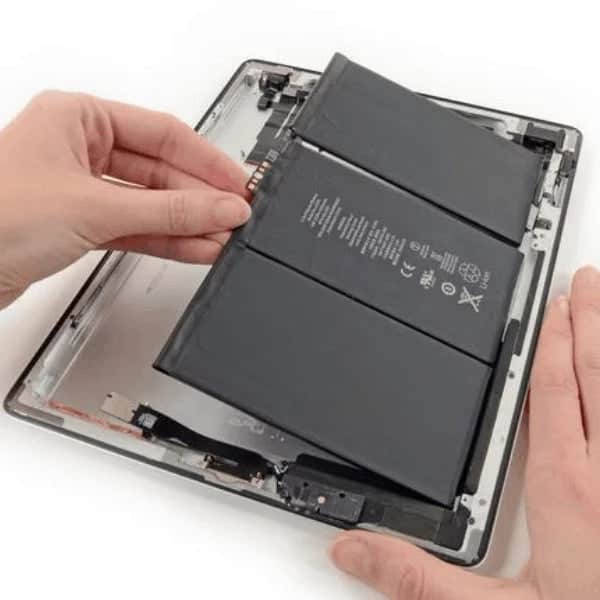
- Remove Old Battery: Gently pry the old battery from the adhesive strips. You might need to reapply heat to loosen the adhesive if needed.
- Clean: Clean any adhesive residue with isopropyl alcohol.
- Install New Battery: Place the new battery in the correct position and connect the battery connector.
- Reassemble: Reconnect any other cables, carefully align the screen, and press it firmly to seal it back into place.
iPad Battery Health
Your iPad’s battery health degrades over time, which is normal. You can check your battery’s health in Settings > Battery > Battery Health. This will show you the maximum capacity and peak performance capability of your battery.
iPad Battery Life
Several factors affect your iPad’s battery life, including screen brightness, app usage, and background activity. You can extend your battery life by adjusting these settings and closing unused apps.
Replace iPad Battery
If your battery health is significantly degraded or you’re experiencing unexpected shutdowns, it might be time for a replacement. You can replace the battery yourself using a replacement kit or take it to an Apple Store or authorized repair shop.
Key Takeaways
- iPad battery service is available through Apple and authorized providers.
- Self-repair requires precision and can void the iPad’s warranty.
- Proper tools and knowledge are essential for battery replacement.
Preparing for Battery Replacement
When an iPad’s battery life begins to degrade, it may be time to consider a replacement. This section guides you through understanding when a replacement is necessary, gathering the tools you’ll need, and navigating service options for your device’s battery.
Determining Replacement Necessity
The first step is to check if the battery indeed requires changing. Noticing a significant decrease in battery life or if the iPad battery holds less than 80% of its original capacity are cleary signs. If the iPad is under AppleCare warranty and shows such signs, battery service may be covered at no additional cost. Always confirm your warranty status with Apple Support before proceeding.
Tools and Materials
Should you choose to replace the battery yourself, you’ll need specific tools to aid in the process. Here’s a straightforward list:
- Spudger: For gently prying connectors and components
- Suction cup or suction handles: To lift the screen from the device
- Opening picks: To slide between the screen and body to separate adhesive bonds
- Phillips screwdriver: To unscrew internal components
- Isopropyl alcohol: For loosening adhesive
- Hair dryer or iOpener: To apply heat and soften adhesive
- Anti-static clamp or clear packing tape: To hold components in place
- Adhesive strips: For reattaching the screen
- Magnetic project mat: To keep track of screws and small parts
- Eye protection: To safeguard eyes from any potentially harmful debris
Always handle the battery and other parts carefully, avoiding any puncture or damage to the battery, which can be hazardous.
Service Options
If you prefer professional assistance or if your warranty covers battery service, contact an Apple Authorized Service Provider or schedule a visit to an Apple Store. Fees may apply if the iPad is out of warranty. Service through Apple guarantees the use of genuine Apple parts and ensures the continued quality and performance of your device post-repair. If the battery service isn’t covered by warranty, Apple typically charges a fee, which is a comprehensive cost including parts, labor, and shipping if necessary.
Executing Battery Replacement
When replacing an iPad’s battery, it is crucial to proceed with care to prevent damage to the device. The process involves a series of delicate steps, ranging from opening the device to installing a new battery and putting everything back together.
Opening the iPad
The first step is to safely open the iPad. This requires a heat source to soften the adhesive that secures the display. Once the edges are sufficiently heated, use a spudger or a plastic opening tool to gently pry the display from the frame. It’s important to start from the side opposite to the home button to avoid damaging the display cables located near the bottom.
Battery Removal Process
After gaining access to the interior, the battery removal process begins. First, disconnect the battery contacts using a spudger to prevent short-circuits. Remove any screws securing the battery to the housing with a Phillips screwdriver. If there’s adhesive holding the battery, carefully apply heat and use clear packing tape or a plastic card to lift the battery away from the case. Be mindful of cables and the logic board during removal to avoid causing further issues.
Installing the New Battery
Inserting the new battery involves reversing the removal steps. Place the new battery in the housing and secure it with adhesive strips. Connect the battery contact pads, ensuring a firm connection for power continuity. Be careful to align the battery properly so that it fits without stress on the cables or the frame.
Reassembling the iPad
Finally, reassembly requires precision. Begin by reattaching any cables, including the display and digitizer, and then carefully position the LCD back into the frame. Use the correct adhesive strips around the edges to seal the display assembly. Verify that the ambient light sensors and the front-facing camera are free of obstruction and properly aligned. After securing the display, test the iPad to ensure functionality, especially the home button and touch response.
Following these steps with attention to detail will help complete the battery replacement successfully.
Frequently Asked Questions
When your iPad’s battery starts to underperform, a replacement might be necessary. Here’s what you need to know.
How much is the service fee for an iPad battery replacement?
The fee for an iPad battery replacement by Apple varies depending on whether your device is covered by warranty or AppleCare+. Outside of warranty, the service costs typically $99 plus shipping and taxes.
What is the typical lifespan of an iPad battery?
An iPad battery usually lasts for about 1000 charge cycles while retaining up to 80% of its original capacity. This typically translates to a few years of usage depending on how often you use and charge your device.
Can I get my iPad battery replaced at any repair shop?
While third-party repair shops can replace your iPad battery, it is recommended to use authorized Apple service providers to ensure the quality and preserve the device’s warranty.
What factors should I consider to decide if I should replace my iPad battery?
Consider replacing your iPad battery if it drains quickly, the device shuts down unexpectedly, or if it needs more frequent charging. Performance issues like these indicate battery health has diminished.
Are there different costs associated with iPad battery replacement based on the model?
Yes, battery replacement costs can vary based on the iPad model. Older models could be less expensive to service, but it’s best to consult with Apple or an authorized service provider for exact pricing.
How long does the battery replacement process take for an iPad?
The time it takes to replace an iPad battery can range from a couple of hours to a few days, depending on the service provider’s schedule, availability of parts, and whether you’re mailing in your iPad or taking it to a store.

