Getting Gmail on your Apple Watch can open up a whole new level of convenience, allowing you to receive notifications and manage your emails directly from your wrist. Setting up Gmail on your Apple Watch starts with ensuring that your Gmail account is properly set up on your iPhone. Once your email is in order on your iPhone, notifications can be enabled to keep you informed of new messages without having to reach for your phone.
Managing your Gmail notifications and interactions on the Apple Watch is straightforward. In the settings, you have the option to customize which email accounts you would like to receive notifications from, enabling you to stay connected to your most important emails. Additionally, when using your Apple Watch, actions such as archiving, starring, or reading email can be done with simple touches and swipes, streamlining your email management on the go.
Easy Ways to Access Gmail on Apple Watch
While there’s no dedicated Gmail app for Apple Watch, you can still stay on top of your Gmail inbox with a few simple tricks. Here’s how to get Gmail notifications and even reply to emails directly from your Apple Watch:
Getting Gmail Notifications
- Enable on iPhone
- Go to “Settings” -> “Notifications” -> “Gmail”
- Toggle “Allow Notifications” to on.
- Customize alert sounds, badges, etc.
- Set up in Watch App
- Open the “Watch” app on your iPhone.
- Tap “My Watch” -> “Notifications”
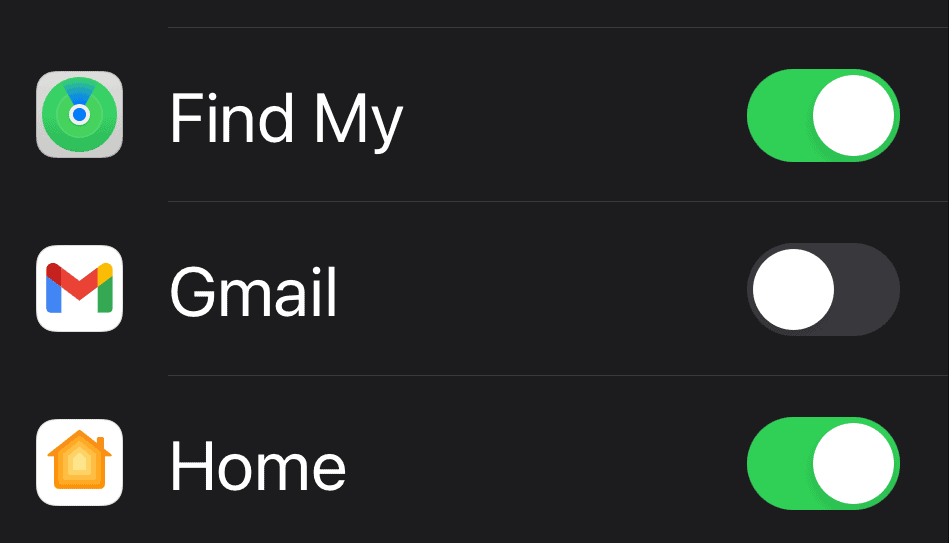
- Scroll down and make sure the Gmail toggle is enabled (in green).
Replying to Gmail on Apple Watch
Since there’s no Gmail app, you’ll be replying from Apple’s built-in Mail app. Here’s how to set that up:
- Add Gmail to iPhone’s Mail App
- Go to “Settings” -> “Mail” -> “Accounts”
- Tap “Add Account” -> “Google”
- Follow the sign-in process
- Enable Mail Notifications
- Like before, go to “Settings” -> “Notifications” -> “Mail”
- Make sure notifications are enabled and customized to your liking.
Using Your Apple Watch with Gmail
- Receive Notifications: When a new Gmail arrives, you’ll see a notification on your Apple Watch.
- Quick Reply: Tap the notification to view a short snippet of the email. You can use preset responses, dictation, or the scribble feature to send a quick reply.
- Mark as Read: Swipe left on the notification and tap the “Mark as Read” option.
Limitations to Know
- No Full Email: You can’t read entire emails on your Apple Watch, only short previews.
- Actions Require iPhone For anything more, like deleting, archiving, or replying with a longer message, you’ll need to switch to your iPhone.
Table of Key Settings
| Setting Location | Description |
|---|---|
| iPhone Settings -> Notifications -> Gmail | Enable notifications and choose your alert style |
| Watch App -> My Watch -> Notifications | Ensures your watch mirrors Gmail notifications |
| iPhone Settings -> Mail -> Accounts | Add your Gmail account to the iPhone Mail app |
Key Takeaways
- Setting up Gmail requires adding your account to your iPhone and adjusting notification settings.
- Your Apple Watch allows you to manage emails with simple gestures.
- An uncomplicated process enables you to stay connected to your inbox effortlessly.
Setting Up Gmail on Your Apple Watch
Starting with the right setup, users can check their Gmail messages right from their wrist. It involves installing the right app on the iPhone and syncing the Gmail account with the Apple Watch.
Installing the Appropriate Mail App
First, ensure the official Gmail app is installed on the iPhone. If not, download it from the App Store. Some users prefer third-party apps like Spark or Canary Mail for their unique features, and these can also link to the Apple Watch.
Syncing Your Gmail Account with the Apple Watch
With the Gmail or preferred mail app in place on the iPhone, open the Watch app. Users must ensure their Gmail account is added to the iPhone’s Mail accounts under ‘Settings’. Then, go to ‘Notifications’ in the Watch app and switch the Gmail slider on. This action will sync Gmail notifications with the Apple Watch, allowing emails to be viewed directly on the device.
Managing Gmail Notifications and Interaction
When using Gmail on the Apple Watch, managing notifications and being able to read and reply to messages are key functions for maintaining communication without reaching for your iPhone.
Customizing Notification Settings
To ensure you’re alerted about new emails, enable Gmail notifications on your Apple Watch. Open the Watch app on your iPhone and select Notifications. Find Mail and toggle the setting to mirror iPhone alerts for Gmail. Here, you can also handle settings for sound and haptic alerts.
Reading and Replying to Messages
Reading an email on the Apple Watch is straightforward. Simply tap the notification to open the message. Use the Digital Crown to scroll through the content. To reply, scroll down in the email view, and you’ll see options to Archive, Delete, or Reply. You can reply using dictation, emoji, or pre-set responses. Entering a specific address to send a fresh email can be done through Siri, or you can select contacts from your address book directly on the watch.
Frequently Asked Questions
The following queries cover common concerns and provide clear steps on managing Gmail with your Apple Watch. Each answer is designed to make sure you have the information you need to stay connected with your email.
How can I receive Gmail notifications on my Apple Watch?
To receive Gmail notifications, open the Watch app on your iPhone. Go to ‘Notifications’ and toggle the Gmail slider to green. This will enable alerts from your Gmail account on your Apple Watch.
What steps are needed to access Gmail emails on my Apple Watch?
First, make sure your Gmail account is added to the Mail app on your iPhone. Then, open the Watch app, tap the ‘My Watch’ tab, select ‘Mail’, and ensure ‘Mirror my iPhone’ is turned on to access emails.
Why are Gmail notifications not appearing on my Apple Watch?
Check if ‘Do Not Disturb’ mode is off and ensure notifications for the Mail app are enabled on your iPhone. If issues persist, restart both your iPhone and Apple Watch.
Is there an official Gmail application available for the Apple Watch?
There is no official Gmail app for the Apple Watch. Emails are managed through the Apple Watch’s built-in Mail app, which syncs with the Mail app on your paired iPhone.
What are the alternatives for using Gmail on an Apple Watch?
You can use third-party email clients available on the App Store that support Gmail and offer Apple Watch compatibility, like Spark or Outlook, to manage your Gmail account.
How do I ensure my Apple Watch is properly syncing with my Gmail account?
Regularly update both the iPhone and Apple Watch to the latest version of their respective operating systems. Keep the Watch app open on your iPhone and ensure Bluetooth is turned on to maintain the sync.

