The PlayStation 5 is a powerful console with sophisticated cooling and compact design. Understanding its internal layout helps with cleaning, upgrades, and repairs. This guide walks you through a teardown overview, common issues, and repair tips.
⚠️ Disclaimer: Opening your PS5 may void warranty. Attempt repairs only if you’re confident, and always unplug the console before working on it.
PS5 Teardown Overview
1. Outer Shell

- Two removable white plastic panels.
- Easy to detach without tools — slide and lift.
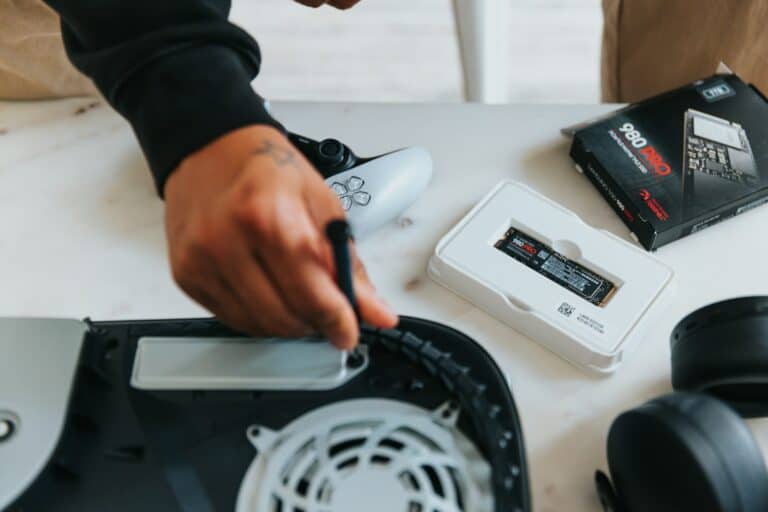
- Provides access to dust catchers and M.2 SSD expansion slot.
2. Internal Components
- Ultra HD Blu-ray drive (in disc edition).
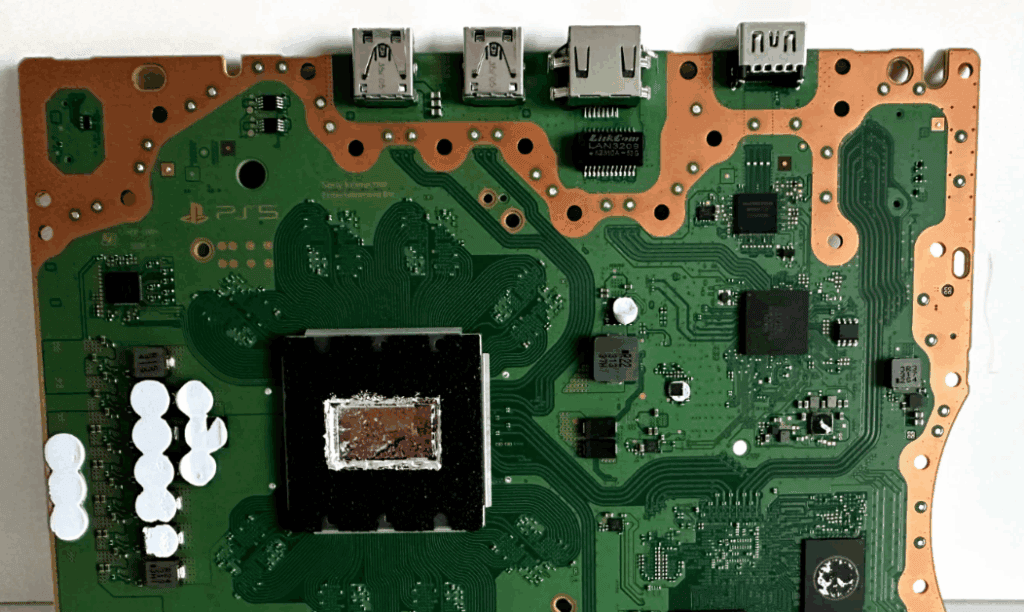
- Custom motherboard with AMD CPU/GPU (SoC).
- 16GB GDDR6 memory soldered to the board.
- Large heatsink with copper heat pipes and aluminum fins.
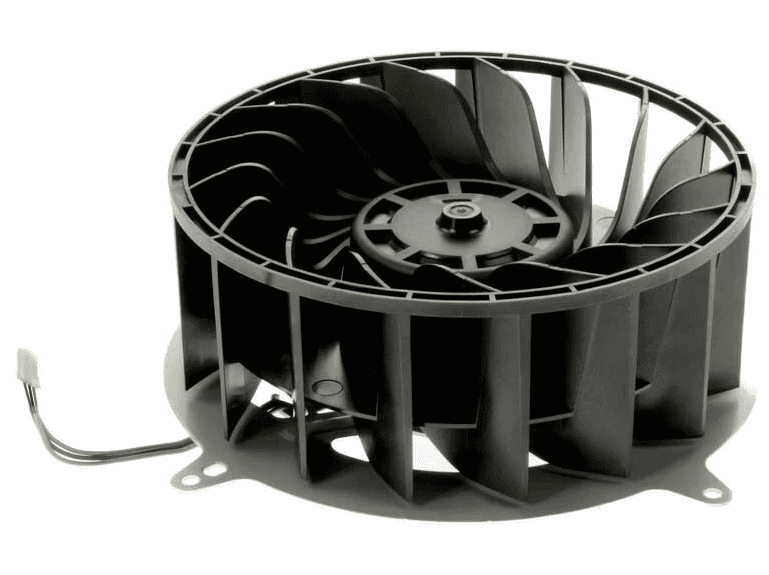
- 120mm double-sided fan for cooling.
- Liquid metal thermal interface between CPU and heatsink.
- Internal power supply unit (PSU), rated ~350–400W depending on model.

Source: iFixit PS5 Teardown PDF
Tools You’ll Need
- Phillips #1 and #2 screwdrivers
- Plastic spudger / pry tool
- Tweezers
- Isopropyl alcohol (90%+) & microfiber cloth (for cleaning)
- Compressed air (for dust removal)
Step-by-Step Teardown (Simplified)
- Remove Side Panels
- Slide off both white panels.
- Clean dust catchers if needed.
- Remove Fan
- Unscrew and disconnect the 120mm fan.
- Clean blades and housing.
- Remove Power Supply Cover
- Unscrew metal shielding.
- Disconnect PSU cables carefully.
- Access Heatsink & Motherboard
- Remove shielding plates.
- Carefully lift heatsink assembly.
- Note liquid metal under the CPU — handle with care.
- Remove Optical Drive (Disc Edition)
- Unscrew and disconnect ribbon cables.
- The drive is not interchangeable with another PS5 (tied to motherboard).

Common PS5 Issues & Repairs
1. Overheating / Loud Fan
- Cause: Dust buildup, poor ventilation, dried liquid metal.
- Fix:
- Clean dust catchers and fan.
- Reapply thermal paste (advanced).
- Replace fan if bearings are worn.
2. No Power / Random Shutdowns
- Cause: Faulty PSU or shorted capacitors.
- Fix:
- Test PSU output with multimeter.
- Replace PSU module if dead.
3. Disc Drive Issues
- Cause: Misaligned rollers, stuck disc, or laser failure.
- Fix:
- Manually eject stuck disc (small hole on drive).
- Replace drive only with paired motherboard (firmware locked).
4. HDMI Port Damage
- Cause: Plugging/unplugging cables aggressively.
- Fix:
- Requires desoldering and replacing HDMI port (advanced soldering).
- Check for blown HDMI retimer chip if port replacement doesn’t work.
5. SSD Expansion / Storage Errors
- Cause: Improperly seated M.2 SSD or overheating.
- Fix:
- Reseat SSD with heatsink installed.
- Update firmware.
🧩 Repairability Score
According to iFixit, the PS5 earns 7/10 for repairability:
- ✅ Easy to open and clean.
- ✅ Standard screws (no glue).
- ❌ Optical drive locked to motherboard.
- ❌ Liquid metal requires careful handling.
✅ Maintenance Tips
- Clean dust catchers every 3–6 months.
- Keep console in open, ventilated space.
- Use surge protection to protect PSU.
- Avoid moving console while a disc is spinning.
⚡ Bottom Line
The PS5 is fairly repairable compared to past consoles, with modular components and easy cleaning access. Most issues (overheating, fan noise, dust) are user-serviceable, but advanced repairs (HDMI replacement, PSU faults, liquid metal reapplication) require technical skill.
The iFixit PS5 Teardown Video
The PlayStation 5 (PS5), Sony’s latest gaming console, has been a subject of curiosity for those interested in its internal design. iFixit, a well-known entity in the gadget repair community, performed a comprehensive teardown of the PS5 to offer insight into its repairability and hardware composition.
At the heart of the PS5 lies an AMD custom 8-core CPU, which works hand in hand with a potent graphical unit. iFixit’s teardown highlighted Sony’s commitment to a repair-friendly design, noting aspects that favor do-it-yourself (DIY) repair efforts. Key components, such as the power supply and disk drive, are user-replaceable, hinting at the console’s modular nature.
Sony’s approach includes fewer security screws and an absence of adhesive, which is often a point of frustration in the repair process. The presence of a warranty sticker usually deters users from attempting repairs due to the risk of voiding the warranty. However, they found the PS5 to be more accommodating than past models. This kind of design invites owners to engage with their hardware confidently and reduces the potential barrier to entry for repairs.
iFixit’s analysis expressed a positive outlook on the PS5’s potential for repair. Although certain parts may require a bit more effort to access, the overall design suggests Sony considers repairability an essential factor. This teardown not only showcases the internal workings of a major gaming gadget but also acts as a reference point for both consumers and professionals involved in electronics repair.
Internal Components and Architecture
The PlayStation 5’s internal design marks a significant evolution from its predecessors, focusing on powerful hardware and efficient cooling.
Cooling System and Airflow
At the heart of the PS5’s cooling solution lies a large fan capable of pulling air from both sides. This fan works together with a massive heat sink, which operates similarly to a vapor chamber, to disperse heat. The innovative use of liquid metal TIM (Thermal Interface Material) between the CPU and the heat sink maximizes heat conductivity, which helps to keep the system cool and reduces fan noise. Users can also access the fan with ease to clean out dust, prolonging the device’s optimal performance.
Storage and Expansion Options
The PS5 comes with a high-speed SSD, providing 825GB of internal storage for the standard edition, and the same for the PS5 Digital Edition—which lacks the optical drive. For those looking to upgrade, an M.2 slot is available for off-the-shelf storage expansion. It supports various sizes of M.2 SSDs, but it’s important that these expansions meet Sony’s speed requirements to ensure smooth performance.
Motherboard and Processing Power
Powered by an AMD custom 8-core / 16-thread 3.5 GHz Zen 2 CPU and an AMD Radeon RDNA 2 GPU, the PS5’s motherboard is optimized to fit modern gaming’s demands. It boasts a high memory bandwidth thanks to its GDDR6 memory interface, which works in harmony with the CPU and GPU to deliver breathtaking gaming experiences. This precise combination of AMD Ryzen Zen 2 and RDNA 2 technologies is the key to the device’s robust processing power.
Peripheral Connections and Power Supply
The PS5’s motherboard hosts a variety of ports to ensure comprehensive connectivity options. These include multiple USB-A and USB-C (USB Type-C) ports, a LAN connector for wired internet access, and a built-in Wi-Fi module. The power supply unit is integrated within the console’s chassis, providing stable energy to all components, including the 4K UHD Blu-ray drive present in the standard edition—this is absent in the Digital Edition, which instead offers a sleeker profile.
Repair and Maintenance
When it comes to keeping your PlayStation 5 running smoothly, a few pointers on repair and maintenance can go a long way. Let’s look at the disassembly process, how to tackle common issues, and ensure the longevity of your console.
Disassembly Process
Taking apart your PlayStation 5 shouldn’t be a daunting task. IFixit suggests that the process is pretty straightforward, thanks to the console’s design. Key components are secured with standard screws, making them accessible with common tools. However, you’ll need a T8 torx security driver to manage the back case’s security screws. Always remember to discharge any static electricity from your body before you start to protect the sensitive electronics inside.
Common Issues and Solutions
Gamers might face issues such as a black screen, the disk drive malfunctioning, or the console turning off randomly. For a black screen, checking the HDMI cable and 4K settings should be the first steps. If the disk drive won’t work, carefully cleaning it and ensuring there’s no debris could be a fix. Software glitches causing the console to turn off suddenly might require a software update, which is available on the Sony PlayStation support site. Regular maintenance, like using the vacuum-able dust ports to keep the internals clean, can prevent many problems from starting.
Sustainability and Longevity
The PlayStation 5 is designed for a lengthy life span, and IFixit gives it a high repairability score, meaning it’s easier to fix than many other tech gadgets. Replacement parts are mostly modular and replaceable, promoting sustainability. It’s also backwards compatible, so gamers can still enjoy their old favorites, which adds to the console’s longevity. Sony and IFixit provide valuable support and guidance for repairs, lessening the likelihood you’ll need a new console soon. Keeping the DualSense controllers and other peripherals in good shape is also crucial, as they’re often the first to show wear and tear.
Frequently Asked Questions
Before you begin disassembling your PS5, getting familiar with the tools you’ll need and the different procedures for each model is essential. Let’s explore some common questions that come up during the teardown process.
What tools are required for disassembling a PS5 console?
He or she will need a variety of screwdrivers, including a Phillips #1 and a T8 or T9 security Torx bit. A spudger, tweezers, and a pry tool are also crucial for safely handling the components inside.
How is the PS5 Digital Edition teardown different from the disc version?
The major difference is the absence of a disc drive in the Digital Edition. This changes the layout slightly, but the overall teardown process is similar.
Can you provide a guide for taking apart the PS5 controller?
Yes, a guide would typically walk a person through the steps of removing the screws that keep the controller’s housing in place, disconnecting the battery, and carefully separating the various layers to reach the internal components.
What are the steps involved in opening a PS5 to clean it?
To open a PS5 for cleaning, one should start by removing the base stand and the outer plates. Then, detach the dust catchers and proceed to remove the inner screws to access the fan and other components that accumulate dust.
Are there specific screws to be aware of during a PS5 disassembly?
Indeed, the PS5 utilizes a mix of standard Phillips screws and security Torx screws. Pay close attention to the location of each screw type to avoid confusion during reassembly.
Where can I find a schematic diagram of the PS5 internals?
Schematic diagrams can usually be found in repair manuals or through online repair communities, such as iFixit, that offer detailed teardowns and instructions for devices like the PS5.


