Installing Cisco YANG Suite can greatly enhance how you manage and interact with your network. It supports powerful interfaces like NETCONF, RESTCONF, and gNMI, allowing for seamless integration with Cisco’s network operating systems. The installation process is straightforward, especially when using Docker and Python package management.
To set up Cisco YANG Suite, you will need to download the repository and follow the installation instructions. This process requires around 3.5GB of memory to load large models, so ensure your system meets this requirement. Once installed, YANG Suite provides various tools and plugins to help you adopt programmable interfaces efficiently.
For professionals who want to improve their network management capabilities, Cisco YANG Suite is an invaluable tool. Its documentation offers clear guidance, and you can find numerous community resources to assist with any challenges you encounter during installation or usage.
Simplifying Network Management with Cisco YANG Suite
What is Cisco YANG Suite?
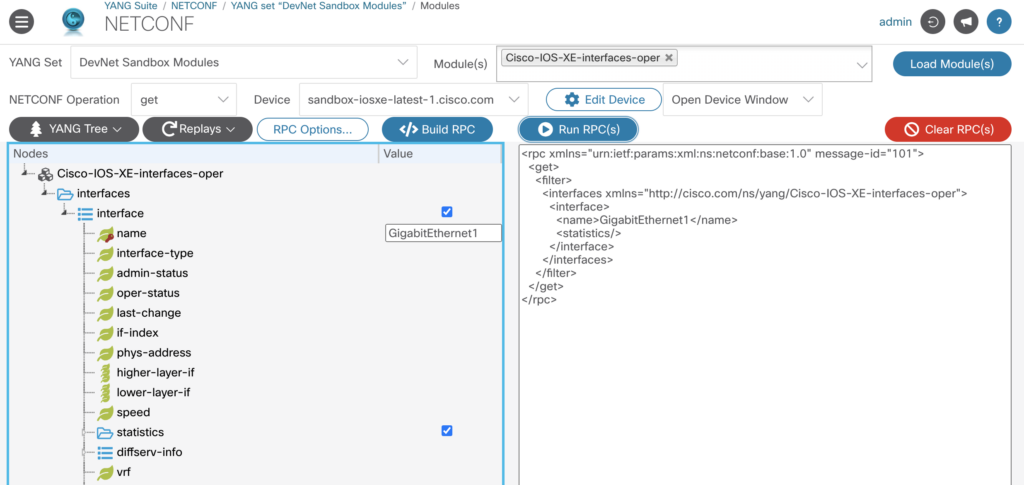
Cisco YANG Suite is a powerful toolkit designed to simplify network automation and programmability. It provides a user-friendly interface for interacting with network devices using YANG models, a standardized language for describing network configuration and operational data.
Prerequisites for Installation
Before diving into the installation process, ensure you have the following prerequisites in place:
- Docker: YANG Suite runs as a Docker container, so you’ll need Docker installed on your system.
- Git: You’ll use Git to clone the YANG Suite repository from GitHub.
- Sufficient Resources: YANG Suite requires at least 3.5 GB of memory to handle large Cisco native models.
Installation Steps
- Clone the Repository: Use Git to clone the YANG Suite repository from GitHub:
git clone https://github.com/CiscoDevNet/yangsuite- Generate Test Certificates (Optional): If you’re testing in a lab environment, you can generate self-signed certificates:
   cd yangsuite/docker/
./gen_test_certs.sh- Start YANG Suite: Launch YANG Suite using Docker Compose:
docker-compose up- Access YANG Suite: Open your web browser and navigate to
http://localhostorhttps://localhost:8443.
Table: Key YANG Suite Features
| Feature | Description |
|---|---|
| YANG Explorer | Browse and explore YANG models to understand network device capabilities |
| NETCONF/RESTCONF | Interact with network devices using these standard protocols |
| gNMI | Subscribe to real-time streaming telemetry data from network devices |
| Validation | Validate YANG models and configuration data |
YANG Suite empowers network professionals to automate complex tasks, streamline workflows, and gain deeper insights into their network infrastructure. By leveraging the power of YANG models and standard protocols, you can unlock a new level of network programmability and efficiency.
Key Takeaways
- Cisco YANG Suite helps manage networks with powerful interfaces.
- The installation process is clear and requires Docker or Python.
- Supports learning through detailed documentation and community resources.
Setting Up Cisco YANG Suite
Setting up Cisco YANG Suite involves several steps including preparing your system, installing the software, and configuring it for initial use. Attention to detail is important to ensure a successful setup process.
System Requirements and Prerequisites
To run Cisco YANG Suite smoothly, you need the following:
- Operating System: Linux, macOS, or Windows with WSL2 enabled
- Python Versions: 3.6, 3.7, or 3.8
- Memory: At least 3.5GB RAM
- Docker: Docker and Docker Compose installed
- Git: A working Git installation
Ensure your system meets these requirements and has internet access for downloads.
Installation Process
- Clone Repository:
git clone https://github.com/CiscoDevNet/yangsuite.git - Navigate to Directory:
cd yangsuite - Install Dependencies:
- For Docker:
docker-compose up -d - For Python (Virtual Environment):
python3 -m venv venv
source venv/bin/activate
pip install -r requirements.txt
- For Docker:
- Start YANG Suite:
./start_yang_suite.sh
Securing Access
Use HTTPS:
Generate SSL/TLS certificates with OpenSSL or use self-signed certificates:
openssl req -newkey rsa:2048 -nodes -keyout server.key -x509 -days 365 -out server.crt
Configure NGINX or an NGINX container to manage these certificates ensuring encrypted HTTP communication.
Launching and Initial Configuration
Access YANG Suite in a Web Browser:
https://localhost:{{PORT_NUMBER}}
Default username is admin, and you need to set a secure password. Configure Django settings for additional security.
Initial Device Configuration:
Add a device profile via the yangsuite-devices section to connect to network devices.
YANG Suite Core Functionality
YANG Suite offers core functionality to interact with YANG models effectively:
- Device Management: Profiles and settings
- YANG Models: Load and browse YANG modules
- Modules and Sets: Organize and manage YANG files
- API Testing: Validate and test functionality through GUI
Networking Protocols Support
Supports multiple protocols:
- NETCONF
- RESTCONF
- gRPC Telemetry
- gNMI Telemetry
Each protocol supports specific networking features available on platforms like Cisco IOS XE, IOS XR, and NX-OS.
Plugin Management and Extensibility
Plugins are central to YANG Suite’s flexibility:
- Manage Plugins Page: Install, update, and configure plugins.
- Popular Plugins: Various plugins for schema validation, automation, and custom operations.
Plugins extend capabilities for dealing with YANG models and protocols.
Interacting with YANG Models
The suite facilitates YANG model interactions:
- Browse: View module hierarchy using
yangsuite-yangtree. - Edit and Validate: Using
yangsuite-filemanager, edit YANG files. - Search: Utilize XPath to find YANG data nodes.
Advanced Usage and Features
Leverage advanced features for specific needs:
- Automation: Automate tasks with YANG Suite’s scripting capabilities.
- Validation: Validate YANG data models in multiple formats (YAML, JSON, XML).
- Testing: Test configurations using built-in tools.
Expand functionalities through comprehensive Cisco Learning Labs and resources available on platforms like YouTube.
Frequently Asked Questions
These FAQs provide essential information about installing Cisco YANG Suite on different platforms and understanding its functionalities and costs.
What are the system requirements for Cisco YANG Suite on Windows 10?
Cisco YANG Suite requires Docker to run. Ensure you have Docker Desktop installed on your Windows 10 system. You may also need a minimum of 4GB RAM and ample disk space.
How can I install Cisco YANG Suite on a Macintosh computer?
Begin by installing Docker for Mac. Once Docker is set up, clone the YANG Suite repository from GitHub and follow the instructions in the Docker directory to start the installation process.
What is the correct procedure for installing Cisco YANG Suite on an Ubuntu platform?
On Ubuntu, ensure Docker is installed. Clone the YANG Suite repository from GitHub. Navigate to the Docker directory and run the provided shell script to complete the installation.
From where can I download the latest version of the Cisco YANG Suite?
Download the latest version of Cisco YANG Suite from the official Cisco DevNet website or from its GitHub repository.
What steps should I follow to explore models within the Cisco YANG Suite?
Log in to the YANG Suite server, go to the “Models” section, and choose the required YANG models. Use the provided tools to explore NETCONF, RESTCONF, and other telemetry options.
Is there any cost associated with acquiring the Cisco YANG Suite for use?
Cisco YANG Suite is open source and free to download. However, consider the potential costs for the server or cloud usage as it depends on your hosting environment.


