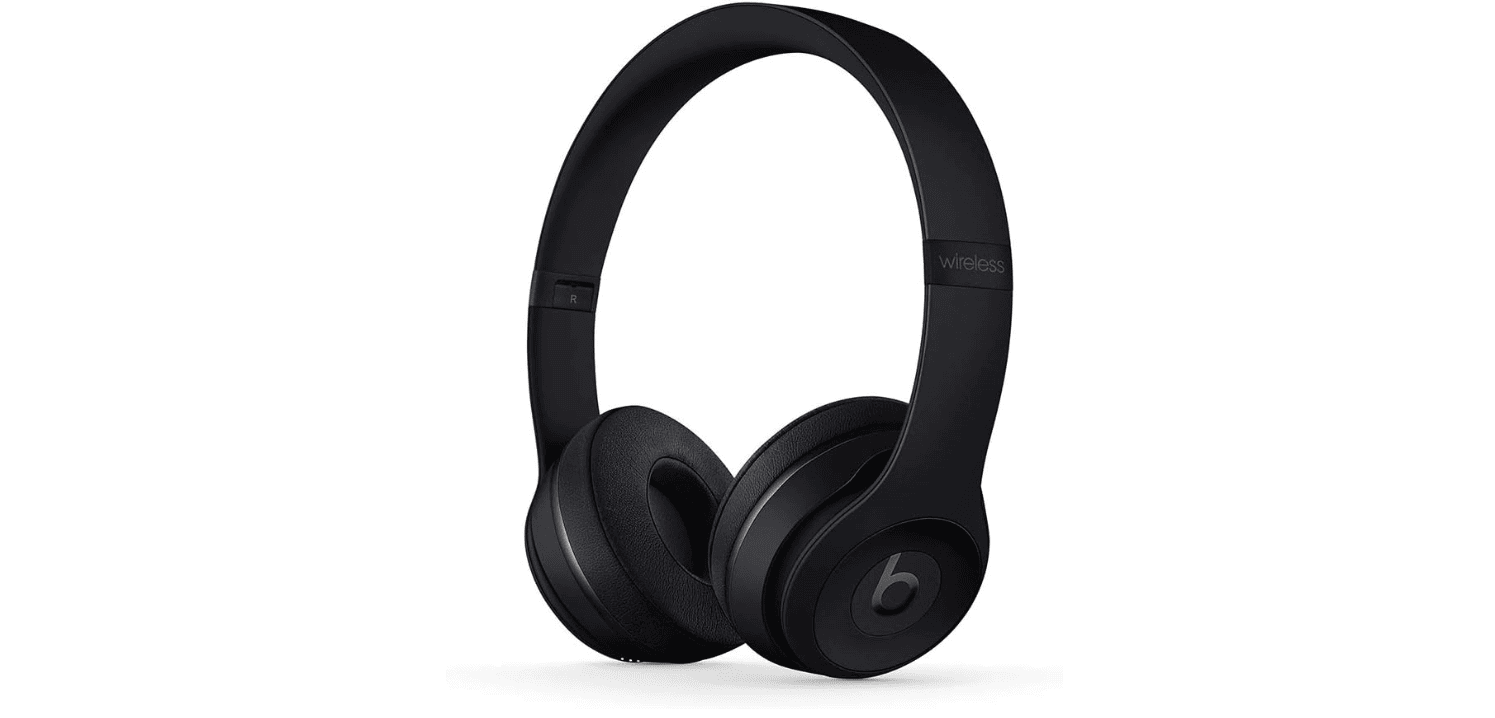
Getting started with Beats Solo 3 headphones is important to ensure they work perfectly every time. These headphones are popular for their high-quality sound and sleek design, making them a favorite among music lovers and tech enthusiasts. This guide breaks down the steps to power on your Beats Solo 3, so you can start enjoying your music without any issues. Whether you’re setting them up for the first time or need a quick refresher, we’ve got you covered.
Follow along to get your Beats ready for an unbeatable audio experience. In this guide, we will show you how to turn on your Beats Solo 3 headphones, troubleshoot any issues, and pair them with your device. With these easy steps, you’ll be enjoying your music in no time!
Power Up Your Beats: A Quick Guide
Beats Solo 3 headphones are known for their sleek design and great sound. But before you can jam out to your favorite tunes, you need to know how to turn them on. This guide will walk you through the simple steps to get your Beats Solo 3 up and running.
Turning On Your Beats Solo 3
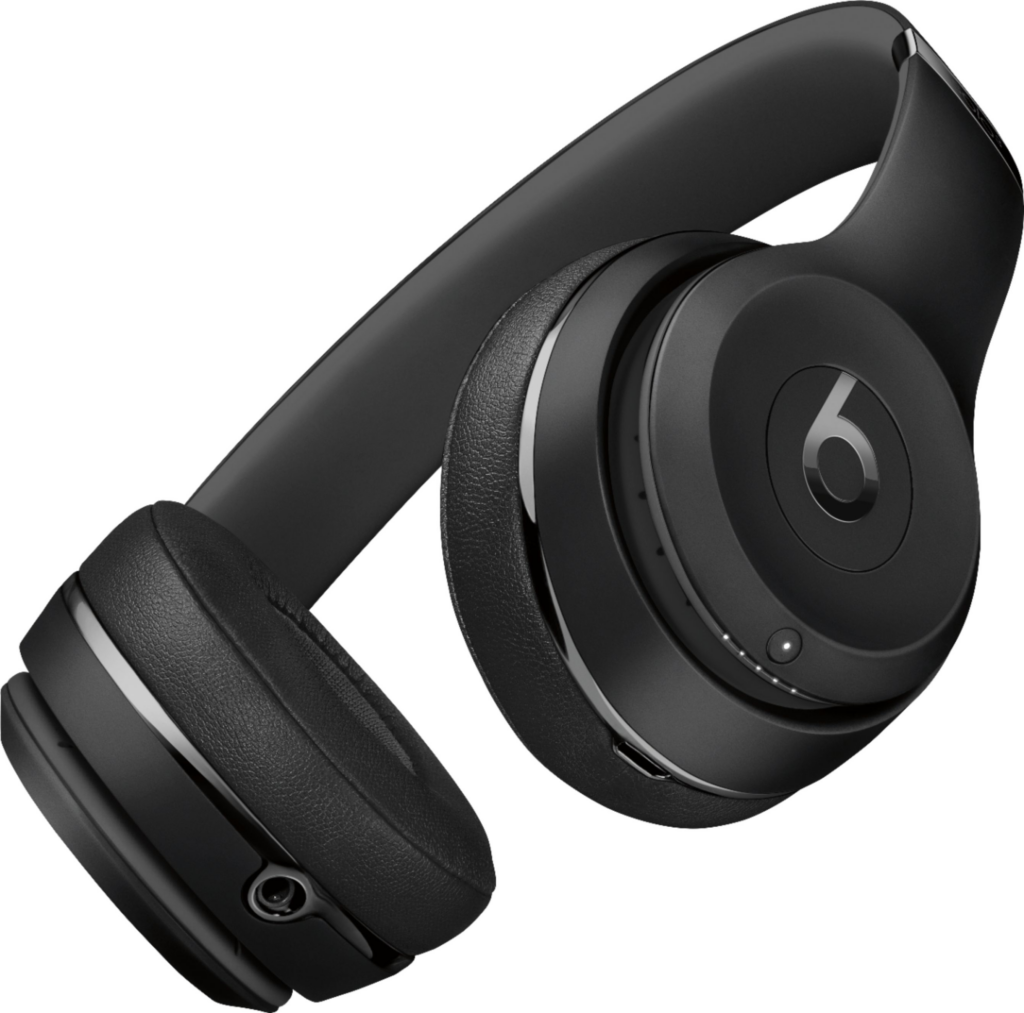
- Locate the power button: The power button is on the right ear cup, marked with the Beats logo.
- Press and hold: Press and hold the power button for about one second.
- Look for the LED light: The LED fuel gauge will light up, indicating the headphones are on.
Troubleshooting Tips
If your Beats Solo 3 won’t turn on, try these troubleshooting steps:
- Charge your headphones: Connect your headphones to a power source using the included micro-USB cable and let them charge for a few minutes.
- Check the battery level: Press and release the power button to see the LED fuel gauge, which will indicate the battery level. If the battery is low, charge your headphones.
- Reset your headphones: Press and hold the power button and volume down button for 10 seconds until the LED light flashes. This will reset the headphones and may resolve the issue.
Pairing Your Beats Solo 3
Once your Beats Solo 3 are turned on, you can pair them with your device using Bluetooth:
- Put your headphones in pairing mode: Hold down the power button for 5 seconds until the LED light flashes white.
- Open Bluetooth settings on your device: Go to the Bluetooth settings on your phone, tablet, or computer.
- Select your Beats Solo 3: Your headphones should appear in the list of available devices. Select them to complete pairing.
Key Takeaways
- Always check the Beats Solo 3’s battery level before use, utilizing the LED indicators for a quick status update, or through your connected device’s widget section or the Beats app.
- Locate the power button on the left ear cup of the Beats Solo 3 headphones, recognizing it by its flush design with the headphone’s surface for a seamless start-up experience.
- To turn on your Beats Solo 3, press and hold the power button until the LED indicator lights up, indicating the headphones are turning on and ready for connection via Bluetooth.
- Pair your Beats Solo 3 with your device through Bluetooth by activating Bluetooth settings on your device and selecting “Beats Solo 3” from the available devices list for a wireless audio experience.
- Troubleshoot any issues with your Beats Solo 3 by checking the charge, performing a reset if needed, ensuring cleanliness of the device, updating software, or contacting customer support for further assistance.
Check Battery Level
Before diving into how to power on the Beats Solo 3, it’s critical to check their battery level. These headphones boast a 40-hour battery life, making them ideal for long listening sessions. However, no battery means no music. To check the battery status, users can follow a simple step.
First, locate the power button on the left ear cup. Pressing and holding this button will not only turn on the headphones but also show the battery level through LED indicators. Five white lights signify a full charge, while one white light indicates a low battery.
Another method to check the battery is through connected devices. If the Beats Solo 3 is connected to an iPhone, the battery level will display in the widget section. For Android users, the Beats app provides this information in a user-friendly manner.
It’s worth mentioning that these headphones come with Fast Fuel charging. This feature gives users about 3 hours of playback after just 5 minutes of charging. This is especially useful for those who forget to charge their headphones but need them ready in a hurry.
| Charging Time | Playback Time |
|---|---|
| 5 minutes | 3 hours |
| Full charge | 40 hours |
By keeping an eye on the battery level, users can avoid unnecessary interruptions during their audio experiences. This step ensures the Beats Solo 3 are always ready for use, whether it’s for a quick commute or a day-long adventure in sound.
Locate the Power Button
Finding the power button is the first step to enjoy the Beats Solo 3 headphones. For someone using these headphones for the first time, locating the power button might seem a bit tricky. However, it’s pretty simple once you know where to look. The power button on Beats Solo 3 headphones is on the left ear cup. It’s not just any button; it’s designed to blend in with the sleek appearance of the headphones.
To correctly identify the power button, look for a small circular button on the back part of the left ear cup. This button is flush with the surface, making it a bit less obvious at a glance but keeping the headphones’ smooth lines intact. Once you’ve found it, turning your Beats Solo 3 on is as easy as pressing and holding this button for a few seconds.
When pressed, the LED indicator next to the power button lights up, signaling that the headphones are turning on. This LED also plays a crucial role in checking the battery level, a vital step before heading out or starting a listening session. Remember, no lights mean the headphones are off or need charging.
Mastering the simple action of locating and pressing the power button opens up the world of high-quality audio that Beats Solo 3 headphones offer. With just a small amount of pressure on the correct spot, users can step into their music experience effortlessly.
Press and Hold the Power Button
Turning on Beats Solo 3 headphones is straightforward. It starts with the power button. Users often overlook this step, but it’s essential for diving into the music. The power button is on the left ear cup. It’s smooth and blends with the overall design, making it a bit tricky to notice at first.
To power on the headphones, press and hold the power button. It’s not a quick press. Hold for about a second. A LED light next to the button will light up. This LED is the key indicator that the headphones are turning on. No light means something’s wrong. Maybe the headphones need charging.
This simple action is the gateway to audio. Once the light indicates that the headphones are on, users can connect to their device. Bluetooth is the method of connection. It’s wireless, making it convenient for on-the-go music enjoyment.
Remember, if the headphones don’t turn on, check the battery. The power button works only if the headphones have charge. The LED light also shows battery level when pressing the power button. Different colors indicate different battery levels. This feature ensures users can manage their listening time efficiently.
Turning on Beats Solo 3 headphones is easy once users know where the button is. Holding it down is all it takes to start the process. With the headphones on, tapping into a rich sound experience is just a few moments away.
Pair with Your Device
After powering on the Beats Solo 3 headphones, the next step is pairing them with your device. This process is crucial for a seamless audio experience. The headphones use Bluetooth technology to connect wirelessly to smartphones, tablets, or computers. Here’s how to do it quickly and efficiently.
First, make sure the headphones are turned on. You’ll know they’re ready when you see the LED light. Next, activate Bluetooth on your device. This step varies depending on what you’re using. On smartphones or tablets, swipe down from the top of the screen to access the quick settings menu. For computers, you’ll usually find Bluetooth settings in the system preferences or control panel.
Select “Beats Solo 3” from the list of available devices on your device’s Bluetooth settings page. If it’s your first time connecting, the headphones might enter pairing mode automatically when turned on. If not, holding the power button for an additional five seconds usually triggers this mode. The LED will blink, indicating it’s ready to pair.
Once the connection is successful, your device will confirm that Beats Solo 3 is connected. From this point on, the headphones should automatically connect to your device whenever both are turned on and within range. Remember, Bluetooth connections can reach up to 30 feet, but obstacles like walls can reduce this distance.
It’s also possible to connect your Beats Solo 3 to multiple devices. However, they can only play sound from one device at a time. Switching between devices is straightforward and can add flexibility to how and where you use your headphones.
Pairing your Beats Solo 3 with your device is a simple process that opens up a world of wireless audio. By following these steps, you’ll be ready to enjoy your music, movies, and calls without the hassle of wires.
Troubleshooting Tips
When your Beats Solo 3 won’t turn on, it’s not the end of the world. There are a few easy steps to try and get them working again. First, check if they’re charged. If the LED doesn’t light up, plug them in for a bit. Sometimes, they just need a little power to get going.
If charging doesn’t do the trick, try resetting them. Hold down the power button and the volume down button for 10 seconds. If it works, the LED will flash. This reset can fix a lot of problems.
Still not working? Make sure the headphones are clean. Dirt or debris in the charging port or on the buttons might be causing issues. A gentle wipe can clear out any obstacles blocking their functions.
Software updates can also be key. Beats Solo 3 get updates that make them work better. Connect them to your device and check for any available updates. Installing the latest software can solve unexpected problems.
Lastly, if you’ve tried everything and they still won’t budge, it might be time to contact support. Sometimes, a professional look is needed to identify and fix the problem. Beats customer service can guide you through more specific fixes or suggest a repair if needed.
These steps are a good starting point for any Beats Solo 3 owner facing troubles. With a little patience and some trial and error, most issues can be resolved.
Conclusion
Turning on and connecting your Beats Solo 3 headphones should now feel like a breeze. With the straightforward steps and practical troubleshooting tips provided, you’re well-equipped to enjoy a seamless audio experience. Remember, keeping the headphones clean, ensuring they’re charged, and staying up-to-date with software are key practices. And if you ever hit a snag, professional support is just a call away. Dive into your music world with confidence, knowing you’ve got all the know-how to make the most of your Beats Solo 3.
Frequently Asked Questions
How do I turn on my Beats Solo 3 headphones?
To turn on your Beats Solo 3 headphones, press and hold the power button located on the left earcup for about one second. You should see the LED indicator light up, signaling that your headphones are powered on.
How can I connect my Beats Solo 3 headphones wirelessly?
To connect your Beats Solo 3 headphones wirelessly, first, ensure they are powered on. Then, on your device, go to the Bluetooth settings and select your Beats Solo 3 from the list of available devices. Once selected, they should connect automatically.
What should I do if my Beats Solo 3 won’t turn on?
If your Beats Solo 3 headphones won’t turn on, first check the battery level to ensure they’re charged. If they’re still not turning on, try resetting them by holding down the power button and volume down button for 10 seconds. This should reset the headphones.
How can I check the battery level on my Beats Solo 3?
To check the battery level of your Beats Solo 3 headphones, simply turn them on and the LED indicator will display the battery status. A steady white light indicates a high charge, while a blinking red light means the battery is low.
What should I do if my Beats Solo 3 are having connection issues?
If your Beats Solo 3 headphones are having connection issues, first try forgetting the device from your Bluetooth settings and then reconnecting. Ensure your headphones are charged and within range of your device. If issues persist, consider resetting your headphones.
How often should I update my Beats Solo 3 software?
It’s recommended to check for software updates periodically, especially if you start experiencing technical difficulties. Updating your Beats Solo 3 headphones can be done via the Beats updater website or through the Beats app for iOS.
Where can I get professional support for my Beats Solo 3 headphones?
For professional support for your Beats Solo 3 headphones, visit the Beats website to access customer service support, find service center information, or contact technical support directly for personalized assistance.

